Photosilkscreen has always been based on hand-cut or photographic film
transparencies. A useful variation can be created simply by saturating an ink drawing
on plain paper with oil (use baby oil--it's easy to work with), which renders the white
paper transparent to light. By extension, using the same treatment it's entirely practical
to burn a screen from a laserprint (or for that matter any other kind of plain-paper print
as long as it's completely black. Some prints lose blackness in the middle of large
solids--often these areas can be easily touched up with a marker). Lay the print on a
stack of newspaper, apply some baby oil and blot dry. Make sure the entire surface is
saturated, without excess oil on the surface.
Direct photo emulsion is a mixture of PVA (white glue) and one of several chemicals, which when dried & exposed to ultraviolet light forms a waterproof polymer. It can be applied to a clean screen with practically any kind of flat applicator, for instance a plastic bondo squeegee from an auto-parts store. Other good tools include screenprint squeegees and plastic or stainless flat-edge kitchen utensils. Scoop about a tablespoon of
emulsion onto the screen, then scrape it out to a thin coating with the edge of your
blade, using a crosshatch pattern. Scrape off the excess--there should remain just
enough to to fill the fabric with no runs. Dry the screen vertically with a fan or let it sit
on supports horizontally with the bottom down. A second coat is often recommended to
fill pinholes. (Similar instructions and diagrams are included with commercial
emulsions.)
Burning (exposing) a screen requires some kind of ultraviolet light source like a metal halide lamp or unshielded blacklight tube. One way is to construct what's called a pile-on table, which is basically a piece of glass supported above a lamp plus some heavy objects to insure good contact between screen and artwork. Another strategy is to use the best UV source of all: the sun. It's light is stronger than any lamp, but it varies with the season, time of day and the weather. Fortunately the standard emulsions have a lot of latitude, which means that if
in midsummer on a sunny day at noon we estimate a minute and a half exposure will
create a good stencil, a minute or two will also be adequate, and that this rule of
thumb will probably apply at other times and seasons (perhaps I should temper such casualness with a recommendation that you make test stip occasionally: simply expose a prepared screen in steps of two, one, one half, one quarter (twice) minutes,
uncovering it with a piece of cardboard in stages. The best time is the point where there's no difference in the emulsion color from the surrounding full four minute exposure).
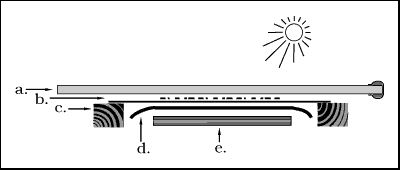
Obtain a piece of plate glass: an 18X24 inch
rectangle is a good size. Be sure to sand the edges; also, I've found that a taped-over
bead of silicone along either side of one edge aids in handling. A piece of felt from a yardage store and a flat board that will cover our image size, say 9x12inches,
completes the kit, the glass on one side and the felt and board on the other acting to
press screen and artwork together. The felt serves to distribute pressure so that the
artwork contacts the screen evenly. Note that a thin shadow will be visible along any edge of the art that isn't contacting the screen.
If it's an hour or two either side of noon this arrangement can be
pointed generally toward the sun by setting it on something like a box or a stool. A
piece of black construction paper or anything opaque acts as a shutter to control the
interval the sun shines on the coated screen. You can create a test strip by simply
moving the shutter across the screen an inch or two at a time in steps of thirty seconds.
After exposing the screen wash out the unexposed areas, the parts that were protected from the sun by the black in the artwork, and blot the stencil dry with newsprint--
|